")
A case where an Oracle DBA has a database instance running on an HPUX machine and needs to mount windows CIFs share to copy some files across the network to the windows shared directory. hence, He has to know how to manage CIFs shares first.
This article explains how to manage CIFS shared directories. for example, you will need to know how to
- Mount remote CIFS Shares.
- List current CIFS shares mounted.
- Temporary unmount CIFS share.
- Permanent unmount CIFS share.
We will explain by example how to use HPUX commands like cifsclient, cifsmount, cifslist, and cifsdb which will allow you to manage CIFS shares. however, We strongly recommend reading This article first to make your life easier on HPUX.
HPUX Manual is your friend
Fortunately, HPUX provides client-based help, like Linux. Hence, when in doubt just type. Always keep in your mind that “man is your friend”
root@ita1 / # man <command name>It will show helpful information about the command
Mount CIFS share
If you mounted storage in Linux. then, It will be easy for you to have HPUX mount cifs shares ( Windows shared folders) on your machine is simple. You will go through three steps 1. load CIFs client. 2.Create a folder 3.mount the remote directory to the local path.
cifsclient is a simple application. It takes two parameters start and stop
to start cifsclient just execute the following command.
root@ita1 / # cifsclient startCIFS Client started; process id: XXXX
root@ita1 / #secondly, create a directory where you will mount the remote share
root@ita1 / # mkdir -p /mnt/myshareLastly, to mount your shared folder you need to know
- Server name or IP
- your shared folder name on network
- your access credentials to the shared folder (username /password)
Simply we use the cifsmount command to mount the remote directory with the following syntax
cifsmount <server name/IP>:/<share-name> /mount/directory -U <username> -P <password>In our example, The shared directory name is “stage” on remote server IP 192.168.0.220. And the access credential is “stage” for username and the same for the password. We will use the following command
root@ita1 / # cifsmount 192.168.0.220:/stage /mnt/myshare -U stage -P stageList CIFS shares on hpux
to list current CIFS shares we user the command cifslist it will show a table of all shared CIFS and its status and remote username for each server.
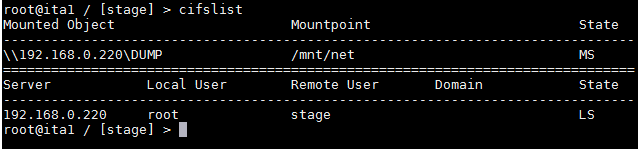
The following explanation for Letters mentioned in State column
- M Mounted
- R Read-only
- L Logged in
- S Stored in 0the database
Temporary unmount CIFS share.
to unmount CIFS share is simple. Just execute the following command
root@ita1 / # cifsumount /mnt/netThis command will temporarily unmount the remote share but whenever cifsclient restarted it will automatically mount it again.
Permanent unmount CIFS share.
to umount a CIFS share permanently. You have to remove it from CIFS share database. First, use the previously mentioned command “cifslist” to list all CIFS shares. Then use the command cifsdb to remove the targeted share from the database.
root@ita1 / # cifsdb -d /mnt/mysharethis command – with -d parameter – will delete the record from the CIFS database permanently.
to sum up, Ad demonstrated The operation of managing CIFS shares on HPUX can be simple when knowing the related commands.
1 comment
[…] the other hand, you could access it over the network as a windows share from HPUX. In order to mount a CD, you have to burn the CD /DVD with ISO9660 file […]